Contents
Materials for making a tomahawk
Choosing the material of you want to make your tomahawk out of is an important decision to make . The weight, durability and the use of the tomahawk needs to be determined before you choose which material you want to use. Two options to consider are making a tomahawk out of steel or stone
Steel
Steel is a good option for a metal tomahawk because it is protected from rust and will last a long time. Additionally, you are able to easily keep it sharp over time compared to stone. You can also more finely control the sharpness of the blade depending on how you plan to use it.
Stone
The native americans were the experts on the stone tomahawk. That is how they made all their tomahawks and after all they play a big part in the history of the tomahawk. Stone tomahawks are much harder to manufacture because you have to find the right stone and it is harder to refine. One thing about a stone tomahawk is that it will always be unique because no two stones are the same. A problem with it is that they are more prone to chipping. However, if you want a more blunt tool a tomahawk made out of stone would be a better choice.
In this post we will talk how to make a tomahawk using steel because that is the more common option.
Things you will need
1.File or grinding wheel
2.1/4 inch plate steel
3.Welding Equipment
4. 3/4 inch heavy gauge metal pipe or wood handle
Steps to making a tomahawk
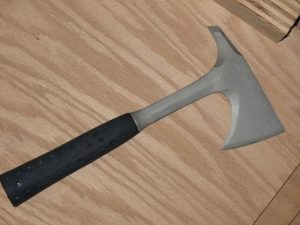
1. Making you tomahawk head- cut your 1/4 inch plate of steel into the shape of a tomahawk blade. You can use other metals such as brass, iron or copper but steel is preferable. You can try to be creative when making your tomahawk blade, but it should be slightly round. If you want to increase your chances of sticking the blade, then increase the surface of the blade. Two choices that you can try is a half moon shape or a more aggressive “Francisca” look for your head.

2. Sharpen the blade-Now that you have made the blade you have to sharpen it. If you don’t, then it won’t be able to stick well or chop well. The blade should be sharpened to about a 300 edge, beveled on either side.
3. A good length to cut your metal pipe /handle is the length of your forearm(from inside of elbow to top of closed hand). The average tomahawk length is about 16-21 inches in diameter. If you feel it is too long, then you can always cut it shorter. That’s the benefit of going DIY style. It is important to note that the longer the handle, the longer it will take to complete one revolution, which means that you have to be a little further from the target.
4.Weld the bottom/butt of the blade to the top edge of the handle. The head should be flush with the top of the handle.
5. Remove the burrs-Make sure that after you finish cutting the metal that you remove the burrs. Any burrs left on the handle or head can pose a danger to the thrower. You have been warned.
Final Product
Time to have some fun
Now it is time to have some fun and use your tomahawk. Tomahawk throwing is fun once you get the hang of it. Make sure to be a proper distance from the target so that you can hit it correctly. The goal is to make the tomahawk make one revolution before hitting the target.

Leave a Reply