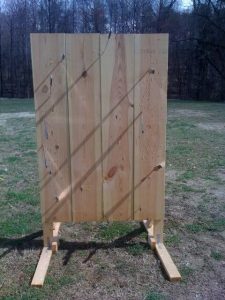
What can I use to make the target?
Well, you want to use wood as your target because what else will your tomahawk correctly stick to. The question is if you’re going to use wood planks or log rounds.
Log Rounds
Log rounds are the best targets to throw at, primarily when you use thicker ones. After one side is too scratched/chopped up, you can always use the other side of the log or make the log thinner. A standard target is 16″, so it’s recommended that you get a log which is at least 20″ in diameter.
Wood Planks
This would be the second best option as a tomahawk target, and on the plus side, it is easier to build a target from. To make a good target out of planks of wood, you need to get about four 2×12 planks which should be at least 6 feet in length. Lay them out next to each other and attach them in the back with a few 2×4’s and some screws. Place a 2×4 on the bottom, middle and top of the wood planks and screw them in. Thick planks aren’t recommended, but as a beginner, this is a great way to start; Unless you are not a beginner and in that case, you can use thinner planks.
Which type of wood should I get?
Tomahawks will stick on almost any kind of wood once it has been treated/cured.Curing/Seasoning the wood takes about 2-3 weeks. You want softer wood for you to target because if it is too hard then the tomahawk will not be able to stick and it will just bounce off the target. Check the list below for some of the preferable wood types.
– Sycamore
– Tulip Poplar
– Cottonwood
– Hackberry
– Ash (hardwood)
– Sassafras (hardwood)
– Beech (oak)
If you cannot get wood from this list, then it is fine once you treat/cure the wood before using it.
Now on to the target stands
You have made a target but how will you make it stand up. For that, you need a target stand. There are different stands that you can make. The type of position that is good for you depends on how big your target is and if you want it to be portable or not.
Basic Stand
You can nail a couple of 2×4 legs to the back of your target in a “V” pattern. Then lean it against a tree or can use another piece of wood to make a tripod stand. It is quickly built and is surprisingly stable. You have to be careful of children and animals because it can be easily knocked out by them.
Custom Stand
 A custom stand is a stand you create to fit your particular needs. One such is displayed in the picture on the left. The target is just leaning against the tree and can be simply turned around if the face gets too chopped up. The target is heavy, so it is positioned in a way so that it does not fall forward. The blocks placed around the tree are there to protect the tree from any missed throws that might damage it.
Portable Stand
This stand is ideal because it can be moved around while at the same time able to hold more large targets. It is more worthwhile to make if you have a large target block plus it allows you to rotate the block to the other side. To make this, you will need 2×6’s to have a sturdy block support system. Measure the front leg at 48” with a 6” hinge block screwed to the top end. Use a 2.5″ or 3″ heavy duty hinge to connect the two front legs. About 12″ from the top attach 42″ long back legs with a 3.5″ x 1/4″ bolt using washers and a wing nut. Cut the top inside corner at an angle so that it doesn’t interfere with the target block. You can use either 2×4′s or 2×6′s for the 9″ long block support arms which can be attached with screws anywhere on the front legs depending on how big the target block is that you are using. Use at least 3 screws that are spread apart vertically as much as possible to help to resist the downward force that a large target would cause. Use screws instead of nails as it is easier to replace the arms or move them if the need arises. It is essential that you cover the top of the stand with the top of the target block so that you do not hit the head of the position, or more precisely the hinge as that will chip your tomahawk blade.
Heavy Duty Stand
The heavy duty stand is made out of good quality landscape timbers which can comfortably hold up our target. It lacks in the portability department unless you have a truck, but it is still movable around the yard as long as you don’t have your large target block on it!You can build this by using five 8′ landscape timbers and a 3′ section of treated 2×4. To hold the wood together, you can use two 6″ long x 1/2″ hex bolts and two 8″ long x 1/2″ hex bolts and about six standard nails. You will have to use a chainsaw to cut the various weird compound angles to create “flats” on the timbers to get it to bolt together solidly.

Leave a Reply